OK, so I’ve been slow at getting this gear review post together as promised. No excuses for the delay so here it goes. I’ll start out with a few significant items and then work my way thru the gear list as appropriate.
BEACH ROLLERS:
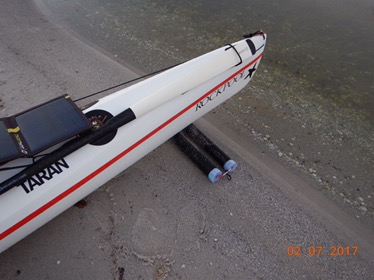
Many folks have asked about the “beach rollers” I made. They were extremely handy and saved the bottom of the kayak. If you are a solo paddler, these are a necessity in my opinion. Even when I was paddling with Gus and Mike, we all used the pair I made. They are very easy to make yourself and I’ve not found anywhere that you can purchase them. Start with some swim noodles from Walmart or other source. Decide how long you want the rollers to be based on the width of your kayak and cut the noodles to desired length. Next cut some PVC tubing to the same length and force inside the swim noodles. I used ½” grey PVC conduit as it gave a very tight fit. You then cut 3” vinyl heat shrink tubing to length and place over the noodle. If you have a heat gun, use that to shrink the tubing. If not, a hot hair dryer will work as well. After the roller is all together, trim the ends so everything is cut nicely. I made two rollers and made mountings so I could pull them out quickly on a surf landing and roll the kayak up the beach. The setup is a line going thru each roller with a loop on each end and an S-clip connecting the two rollers at each end.
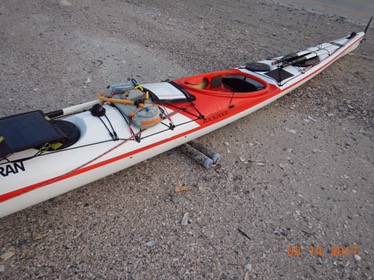
I discovered a few things about the rollers that I’ll pass on. First is that after several weeks in the sun, the heat shrink tubing seemed to shrink in length a little more. Along with that, the noodle seemed to expand in length a little as well. I ended up trimming the noodles with a borrowed bread knife at one of my stops. After several weeks, the entire setup stabilized and I was able to slide the heat shrink tubing to the middle of the roller as needed. The tubing will “walk” towards one end if the rollers are on an angle when you are rolling the kayak. I made one other interesting discovery concerned using the rollers. I had made two with the expectation of placing them about ½ the kayaks length apart and rolling the kayak. On one of my stops early on in the paddle, I placed both rollers (still connected together at each end) under the bow and picked up the stern and rolled the kayak up the beach. I was amazed how much better this worked than having the rollers placed far apart. So now I use them together all the time. Here are some pictures of the setup.


Zoom in and you can see how I mounted the rollers on top of the spare paddle using short bungee loops.

WHEELS:
This is the other significant item for a solo kayaker. And just like the beach rollers, I used them for Gus and Mike’s kayaks when we paddled together and had to move the kayaks to a camp spot at a campground. I did a lot of research on different “carts” and actually purchased several different ones to test. The one I settled on is listed in the gear list with a link to the manufacturer. I would highly recommend this “kayak trolley” (as they are called in the UK). Here are the main benefits of this cart.
The entire setup disassembled into smaller components and fit inside my kayak behind the aft hatch. Extremely rugged components (you will not break anything). Fairly fat pneumatic tires that roll over everything extremely well except really soft sand (rocks, roots, curbs etc. were no problem and soft sand was doable).
I placed the smaller parts into a heavy duty dry bag (just to keep them together) and then stored them in the back of the kayak. Here are some pictures of the setup.


Now I’ll go thru the gear list and mention anything that stands out.
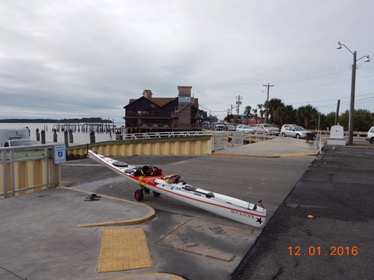
KAYAK:
There are pros and cons to every kayak on a long adventure like this. The only real con I had was that I had to be more careful of the fiberglass. With that said, I did get some good scratches as expected but nothing thru the gel coat. Oyster bars can get you as well as rocks/shells etc. on the beach if you are not paying attention when using the rollers. I paddled a Rockpool Taran for this adventure. This kayak model has set the record for paddling around England as well as around Ireland just to name a few. That demonstrates the first benefit of a good expedition kayak. They must be fast. On several occasions, I ended up combining two days into one for various reasons and would not have been able to do that with a slower kayak. I paddled a bunch of days that were between 27 miles and 35 miles. The kayak should have high volume without being a “barge”. The Taran is 18’ long and 20.5” wide. And, it has significant volume to hold what you need. What was really interesting about the Taran was how it handled the sea states. On smooth flat water, other kayaks in good hands kept up ok. But, when the chop picked up, the Taran walked away from the other boats. She seemed to love the rough water and was a lot of fun to paddle when the waves picked up. The kayak dimensions also made it a great rolling kayak although I never had the need to roll her on this paddle.
PADDLES:
I’m a fan of Greenland paddles and have not paddled with a euro blade since I spent my first day with a Greenland paddle three years ago. Both paddles that I used are Gearlab carbon fiber paddles. They break apart and stow nicely on the back deck and also fit nicely on the front of the kayak when not in use.
SPRAY SKIRT:
I use Reed Chillcheater gear all the time. My spray skirts, cockpit covers, cold weather gear and emergency hatch covers all come from Reed. They are very high quality and work great. They also pack up much smaller than most other brands and the skirts don’t soak thru like a neoprene skirt. What I did discover concerned using the skirts for significant lengths time. Not counting the skirt that I wore holes in due to some clips on my PFD rubbing on it, I went thru two skirts during the paddle. The rubber coating on the fabric ended up separating from the underlying material along the cockpit coaming seam. I have several Reed skirts that I have used for years and never had this problem. After giving it a lot of thought, my hypothesis is that being in a saltwater environment for fifty to sixty days and never getting rinsed off caused the rubber to weaken at the stress points. I’m really not sure if this is the cause or not. Regardless, I will continue to use the Reed skirts as they are the best on the market in my opinion.
PFD:
I used a Kokatat Poseidon PFD with a chest pack, belly pack and tactic pack on the back. It was the clips on the tactic pack that caused the spray skirt problem (be careful of the attaching clips if this add on). As with Reed products, I think the Kokatat products are the best on the market. I’ve got several PFDs from them as well as dry suits and other items and have always been impressed / pleased with the quality. I was able to store all my gear (VHF radio, camera, knife, whistle, emergency flares, backup compass, mini ditch kit, chapstick etc.) in the chest and belly packs perfectly. My DeLorme inReach clipped on the shoulder strap and lived there for the entire paddle.
DELORME INREACH SATELLITE TRACKER:
I had originally planned on using the SPOT satellite tracker but got a good recommendation from Dan concerning the DeLorme and I’m glad I did. The inReach performed flawlessly the entire trip. It has all the functionality of the SPOT and significantly more. It was also very easy to use. I do admit that I did not use many of the functions but having the ability to communicate (send and receive messages) via satellite was significant for me. In my research I found many positive reviews and most all of them said you could get about five days on a single charge. I opted for the DeLorme extreme plan which allowed me to “ping” the satellite every five minutes while I was paddling and the most battery life I used on a long day was ten percent. What I did was turn it on in the morning when I hit the water and send a “Paddles Wet” pre-canned message to a group of folks and start tracking. At the end of the day when I landed, I would send a “Paddles Dry” pre-canned messaged and turn the inReach off. I would then recharge the unit from the Goal Zero battery pack at night and be good to go. A normal “top off” charge took about 30 minutes. This routine worked great for the entire paddle.
CAMERAS:
I had a GoPro mounted on the front deck and used it several times. The quality was great and the unit was small as well. No issues with this one. The other camera I used is what I would recommend to anyone. It is a Nikon Coolpix AW130 and lives in my PFD pocket. I put a wrist strap on the camera that would float it if I dropped it in the water. The camera took great pictures as well as video and has its own WiFi so I could connect to the phone and download pictures for my daily Paddle Posts.
COLD WEATHER GEAR:
I had a Reed Touring Cag and pants but only used the jacket three times. They are great for cold weather but when the sun starts to shine and temps climb a little you end up getting too warm. I had a pair of bicycle leg and arm warmers and used the arm warmers several times. They worked great and you can pop them off easily while out paddling. The arm warmers were all I used when I left Ochlockonee Bay and the temps were at 31 degrees. It was all I needed since the water was warm so my lower half was fine inside the kayak and the PFD kept my torso warm. If I had to pack again for this specific trip, I would probably leave the Reed pants behind since I did not use them. I only used my MSR neoprene gloves on one day. I was glad I had them.
TENT:
Please see the note in the gear list. The MSR Elixir 2 worked great for the entire trip. It’s very durable and had just the right amount of room for me and gear I normally brought into the tent at night. I’ll use my MSR Hubba Hubba tents for backpacking and keep the Elixir specifically for kayak trips. I highly recommend this tent.
CAMP CHAIR:
I had the Helinox Ground Chair and ended up breaking one of the plastic joints. Regardless, it was still usable until my backup got sent down to me. In my opinion, this is the perfect chair for a kayak trip. It’s small when packed up, comfortable when in use and also allowed me to use it inside my tent when the sun went down and I was doing my daily posts. I do think I was a bit rough and caused the joint to break. My backup was my older one that I’ve used for several years with no problems at all.
TYVEK SHEETING:
This was a list minute item I added to the kit and is not listed in the gear list. I will never do a paddle trip without the Tyvek sheets. Here’s the scoop. I had two sheets that I cut from a big roll I had in the shop. My thought was that I would have one for the front and one for the back when I had to empty the kayak of all the gear stored inside. I did do this and it worked great but that was not the biggest benefit of these sheets. The smaller one was 4’ X 4’ and I would fold it into a 2’ X 2’ square and use it under the camp chair. It kept sand and stuff from getting in the joints when I used the chair out in the open and protected the tent floor when I used the chair in the tent every night. The second sheet was 6’ X 4’ since I wanted a bigger sheet for unloading the bow compartment. What I ended up using it for may surprise many of you. I used a sleeping bag liner more often than the sleeping bag and if the temps dropped into the upper forties I would pull the Tyvek sheet over me and be toasty warm for the rest of the night. This was not in the plan and I’m not sure what prompted me to do this the first time but I ended up doing it a lot on this paddle.
SOLAR PANELS AND BATTERY PACK:
I used a Goal Zero Venture 30 battery pack and Nomad 13 solar panel. One of my earlier Paddle Posts has some pictures and a discussion of the modifications I made to ensure they would handle the saltwater environment. I believe they would have failed if I had not protected the connections and battery pack with the dry bag modification. I learned that keeping the battery pack topped off every day worked great. If I let it get discharged most of the way it could take a little over a day to fully charge. I think this was because the solar panel would sit flat on the front of the kayak and not be aimed directly at the sun for most of the day. Other than that, the setup worked perfectly. This is another “highly recommended” item for a long distance paddle. I never had any power issues or concerns.
ALL THE OTHER GEAR:
The remaining items in the gear list all worked well and I had no issues with any of them so I’ll not go into any details. Just take a look at the gear list. If anyone has any questions about the items above or any other items in the gear list, please leave a comment and I’ll be happy to get back to you.
Happy Paddling
You should patent those rollers and start a new career. :)
Loved the review but have a couple of questions.
You list a bunch of gear that is contained on your PFD, among the items is listed a “mini ditch kit” . What does it contain?
Aerial flares are also listed with a note that they are required when paddling on the coast. Is this a USCG requirement? I carry a rescue laser which I think is superior to the flares because it lasts for hours on 2 AA’s (which I carry spares), compared to the 7 second hang time of the flares. The laser also doesn’t really have an expiration date as long as it is properly cared for.
Thanks!